Tuesday, 31 July 2012

Nail Stamping Blog Challenge

nail stamping plate stamper scraper


Hey fellow bloggers

This is more of a **request** than a blog, I would really really love to take part in a nail stamping challenge group and was wondering if anyone knew of any starting soon / being arranged?  I would be so excited to take part and come up with weekly designs for the duration of the challenge.

I am armed with my new Bundle Monster plates and want to put them to the test! :0)

Please let me know if you do hear of anything on the nail blogging grapevine as I would love to know how to get involved with something like that.

Thank you very much.

Robin Sparkles

YouTube debut - nail stamping for the very first time!


Hey guys

This is a very quick blog post just to let you know I have uploaded my first ever YouTube video!  It is a recording of my first ever attempt to nail stamp and I have that it might show people just how easy / not easy nail stamping really is. :0)

So here it is, the link to my YouTube debut: http://www.youtube.com/watch?v=86KBAMMrXiE

Please feel free to leave comments and let me know what you think ( please be nice :0) )

Blog ya soon guys

Robin Sparkles
Wednesday, 25 July 2012

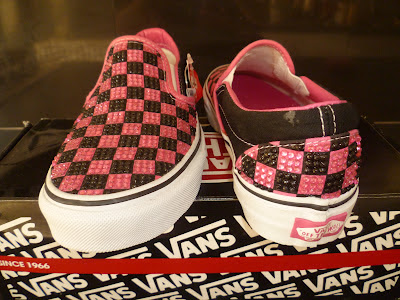
CRYSTALLISATION: Vans 'Off the Wall' checker board pink & black Vans trainers crystal DIY

Hey guys

Today I wanted to show you my latest crysallisation project I have been working on :0)

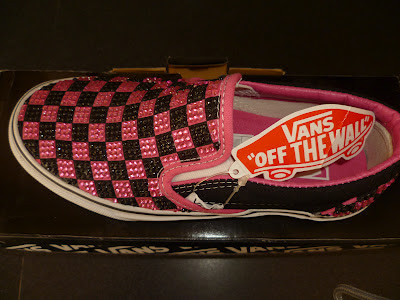
My new Vans 'Off the Wall' pink and black checkerboard trainers and oh how I love the result!

vans off the wall pink and black checkerboard crystal trainers shoes
Vans "Off the Wall" pink and black checkerboard crystal trainers

It was certainly very time consuming, but I hope that you will agree the outcome was well and truly worth it. I used 3mm pink and black crystals and my usual Gem-Tec adhesive glue.

I would love to read your comments below of what you think of these, I hope you all love them as much as I do!

vans off the wall pink and black checkerboard crystal trainers shoes

vans off the wall pink and black checkerboard crystal trainers shoes

Blog you soon guys!

Robin Sparkles
Monday, 23 July 2012

Fish Tail Braid Nail Art

Happy Monday fellow bloggers!!

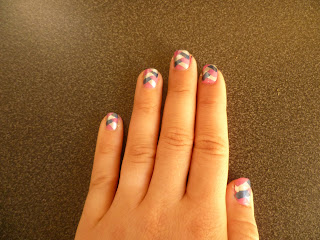
Last night I had a go at a nail art technique I have seen demonstrated by Trying to be Beautiful and I thought it looked fantastic.  It is another variation of the "Fish Tail" technique and is known as the Fish Tail Braid effect.

This is how my Fish Tail braid nails came out and I must say I am quite happy with myself for a first attempt!

Fish Tail Braid Nail Art

Let me know what you think in the comments below.

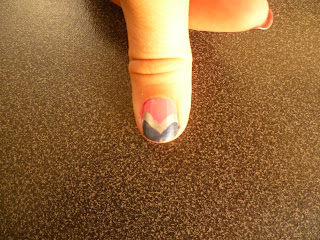
On my other hand( I have not yet quite mastered doing my right hand with my left) I just had another go at the other variation of Fish Tail nails which I had previously blogged about here.

Fish Tail Chevron Nail Art

Fish Tail Chevron Nail Art

Have you had a go at fish tail braid nails? Have you written blog posts about them?  Feel free to leave links to your blog posts as I would love to check out all the different colours people think to use for them.

Thanks for reading and catch you all soon.

Robin Sparkles
Thursday, 19 July 2012

Bundle Monster Nail Art Stamping Plates 2011 & 2012

Hey guys

This is more of a shout out really just to tell the blogging world that I have ordered my Bundle Monster Nail Art Stamping Plates today!!

I am excited beyond belief and hope that the shipping doesn't take too long to the UK.  Has anyone ordered them to the UK that could comment below and tell me how long they took?

I have ordered the Bundle Monster Nail Stamping Plates 2012 and also the Bundle Monster Nail Stamping Plates 2011 as there were too many designs on each that I am just dying to try!

I did a lot of research into the different brands of nail stamping plates out there to purchase and althogh a lot of people do favour the Konad nail stamping plates, the general consensus was that the Bundle Monster nail stamping plates do just as good a job but for a fraction of the price.

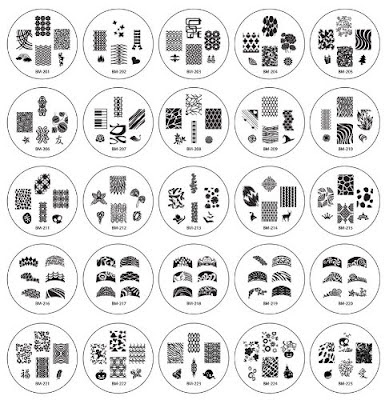
I have attached pictures below of the designs you get on each plate.

The 2012 Bundle Monster nail stamping plate designs are:

bundle monster nail art stamping plates 2012

Then the 2011 Bundle Monster stamping plate designs are:

bundle monster nail art stamping plates 2011

I cannot wait to get my Bundle Monster Stamping Plates and start blogging all the different nail designs I can come up with.  All in all this nail art progress today has made me very very happy! :0)

Please note that I am now on twitter so please pop along and follower me @RobinSparkles1_ it would be great to connect with fellow nail enthusiasts not only on Blogger but also on Twitter.

Blog soon people!!

Robin Sparkles
Wednesday, 18 July 2012

Fishtail Nail Art - DIY nail paint

Hey guys

I have recently been introduced to Fishtail Nail Art thanks to the lovely Trying to be Beautifuls blog post and was searching for different images on Google Images when I came across a different style of fishtail nails to what I had seen on Trying to be Beautiful.

I looked into this a bit more and watched a brilliantly simple video on how to do them by Chalkboard Nails and then decided to give it a go myself.

This is what they came out like........

Fishtail Nail Art Paint DIY
Fishtail Nail Art Paint
Now, I realise that they aren't the neatest, and most of the photos out there are far superior to mine but I don't think they came out at all bad...even if I do say so myself! :0)

I even managed to do it on my right hand using my left also and feel that they look just the same.

Tip:: Have your hand placed down on a steady flat surface will help you lots.

All in all I absolutely love this effect and will be sure to try it in more colour variations in the future.

If you have tried this fishtail nail effect and have blog posts about it, please feel free to comment them below, I would love to see your pictures and how you did.

Robin Sparkles

Fishtail Nail Art Paint DIY
Tuesday, 17 July 2012

Nail Art Ombre Effect - Grandient Sponge Technique DIY

Hiya fellow bloggers!

I recently discovered a nail art technique what I would describe as creating a gradient of colours across your nail however the technical term seems to be called Ombre Nails.  If you search Ombre Nails into Google images you will get hundreds of pictures of different colour combinations come up, some really are beautiful.

Anywho, of course I decided that I must try this so I watched a couple of "How To" videos on YouTube and thought it looked fairly straight forward.  Now that I have given it a go I can confirm that my thoughts were right, anyone can do this so make sure you give it a try!

Finished outcome:
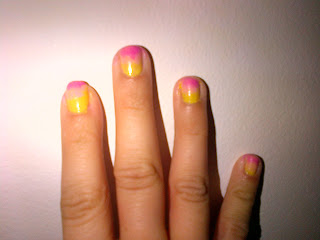
Nail Art Ombre Effect 3 colours - Gradient Sponge Technique

You will need:

  • 2 or 3 different shades of nail polish / varnish / paint that you feel go well together and compliment each other.
  • Make-up sponge
I decided to use the following 3 colours:  Barry M Lemon Ice Cream; OPI Pink Friday; and Rimmel Strawberry Fizz.

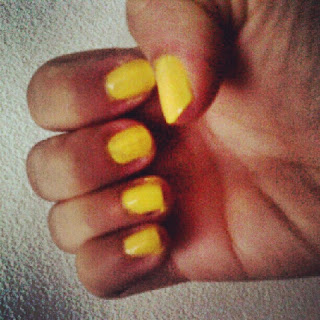
I began by painting my nails with 3 coats of Barry M Lemon Ice Cream as it is quite a thin nail polish and needs several coats to be the strong colour that I wished it to be.
barry m lemon ice cream nail polish paint
Barry M Lemon Ice Cream Nail Polish
I then used the OPI Pink Friday (which was the next lightest shade) and painted a strip onto a make-up sponge.


You then dab the sponge onto your nail slightly above the bottom of your nail so as not to cover up the yellow (or whatever colour you used) entirely.  Do this along each of your nails adding more nail varnish to the sponge when required.
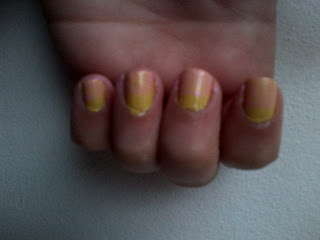
Nail art ombre effect - gradient sponge technique

I then took my third and final colour which was the Rimmel strawberry fizz shade and painted that onto the make-up sponge.  I then dabbed this onto the tip of my nails slightly higher than the start of the previous colour so that both the yellow and light pink were also showing.  The picture at the top of this post is the finished outcome.

You can use as many different shades / colour nail polishes as you wish.  I chose 3 as I had only just cut my nails short and 3 fitted quite comfortably onto my nails.

Glitter is a great effect to add to the tips of the nails.  I do not have any glitter nail polish at the moment but this is something that I would really loved to have tried.  I saw this done when I searched in images and it really finished the ombre effect off beautifully.

If you have tried this effect then please feel free to comment below with links to your blog posts or tell me about how it went.  What colours did you use and how many? I would love to hear from you.

Robin Sparkles

Barry M Nail Paint - Lemon Ice Cream NP307

Hey guys

It probably comes as no surprise to you when I say that I LOVE Barry M nail polishes and yesterday I treated myself to a new colour!  The shade is called Lemon Ice Cream product number NP307 and it is a really handy colour to have, especially if you are into nail art designs.

This is what the nail paint looks like after 3 coats:

Barry M Nail Paint - Lemon Ice Cream NP307
My ONLY criticism of this nail varnish would be that it does require at least 3 coats to be a nice strong colour on your nails.  Other than that, it is great and very summery!

If you were considering purchasing this Barry M nail paint colour then I would definitely recommend you do so.

Hope this was helpful.  If you have any questions at all, please leave them in the comments below and I will get back to you.

Robin Sparkles
Thursday, 12 July 2012

Nail Art - Lines / Stripes nail polish

Hey guys

Today, I have tried to create the lines / stripes look on my nails.  I saw this tried and tested on Trying To Be Beautiful 's blogger and thought I would give it a go.

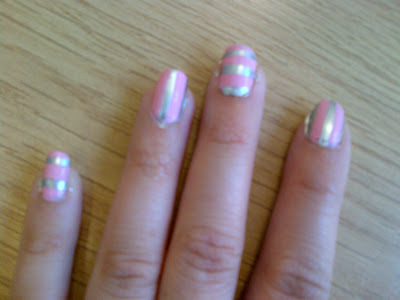
You use the same method as what I explained in my 'Laser Nail Art' blog post, however you just stick the strips of cellotape either vertically or horizontally across your nails to create the desired effect. 

I suppose you could even stick them on a diagonal angle if you fanied something different.

This is how my nails came out:

line stripe nail art nicki minaj nail polish


I used Barry M instant foil effects in Silver, and OPI Pink Friday from the Nicki Minaj Collection.  I think the colours compliment each other really well.

As you can see from the photo, I had a go at both vertical and horizontal stripes / lines and I think both ways look fabulous.

Hope this post has been of help, any questions or comments please please post them below.

Robin Sparkles

line stripe nail art nicki minaj nail polish

DIY Fringe Ripped Vest Top

Hey guys

This is a blog post to tell you how to make your own fringed /ripped long vest top. The inspiration came from a fringed dress that i saw for sale on the Minnies Boutique website that i really liked and i thought "why not give that a go" myself!

I used a long vest top and laid it out as flat as I could.

plain black vest dress t-shirt fringe ripped

Starting from one side i began cutting slits approximately 8-10cm long through both the front and the back of the top at the same time.

plain black vest dress t-shirt fringe ripped


You must continue this process along the entire bottom edge of the vest top.

plain black vest dress t-shirt fringe ripped DIY


Once you have finished that you might wish to cut off the hemmed edge. You should then go along each tassel and give it a little tug to stretch it out a bit.

There you will have it, your very own fringe ripped vest top. From experience, it is best to use a t-shirt material type top, maybe if you would like it to be a vest you could just cut the sleeves off. Otherwise you could cut slits in the sleeves and have those fringed too.

Please feel free to leave comments / questions below and i shall do my best to answer them. Thanks for reading and see you guys soon!

Robin Sparkles
Monday, 9 July 2012

Stud pocket denim jeans shorts - DIY

Hi peeps

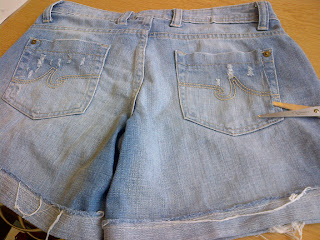
Sorry it has taken me longer than i expected to write this, only just finished them this morning so here is my blog for how to make your own pair of stud pocket denim jeans shorts just like these!

stud pocket denim jeans shorts


You can order pyramid studs on eBay in various different colours and sizes, I chose to use silver studs that are size 8mm but they were also available in gold, brass and gun metal.

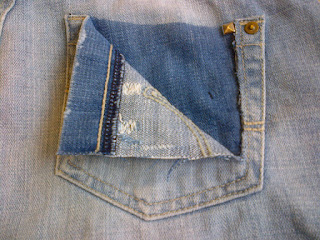
To start, I began by cutting a slit down one edge of the pocket with a pair of scissors.

stud pocket denim jeans shorts

You then need to line up your first stud in the top corner as you can see in the photo below. Be careful to make this as straight as possible as it will form the basis for the rest of the studs.

stud denim jeans shorts DIY

Poke the four spikes through the material of the denim jeans and then use some scissors or tweezers (or anything similar) to bend down the ends into the centre of the stud.  BE CAREFUL:: if you do not bend them down enough they will poke you in the bum! :0)

stud denim jeans shorts DIY

Continue along until you have the whole first row complete.  Then go onto the next line below starting at the end you placed your first stud before. You just need to continue this process all the way down to the bottom of the pocket. 

stud pocket denim jeans shorts

stud pocket denim jeans shorts


Depending on the shape of your pocket you may need to jut in a bit and start skipping the first stud as can be seen in the photo at the top of this post.

So go on, give it a try!  If you have any questions please feel free to comment below this post and I will do my best to help.  Also, if you do decide to have a go I would love if you posted the links to your blog posts below so that I can see how you did.

Until next time peeps!

Robin Sparkles
Thursday, 5 July 2012

OPI Nail Polish Nicki Minaj Collection - Pink Friday

Hey guys

Today I wanted to tell you about a new nail polish I just received in the post yesterday.  It is a wonderful OPI nail varnish from the Nicki Minaj collection and the colour is called Pink Friday.

OPI nail polish varnish nicki minaj collection pink friday
OPI Nicki Minaj Collection - Pink Friday

I absolutely adore the colour, unfortuantely some of my photos do not show the true colour in real life to the naked eye. 
OPI nail polish varnish nicki minaj collection pink friday
Bit of a more realistic colour with the flash on

It is a really cute baby doll barbie kinda shade and is perfect for feeling summery.  It is the kind of colour that makes the tan on your hands look great...if you know what I mean! Or is that just me?!

Anywho, my only negative about this polish is that surprisingly it requires several coats before the colour is really strong and even.  I did 3 coats on each hand and a couple of my nails still have thin enough sections to see my nail underneath.

OPI nail polish varnish nicki minaj collection pink friday

Other than that I think the colour is fabulous and would certainly recommend it to anyone.  It just isn't a nail polish that you can apply a quick couple of coats and dash out.  You will need to apply thicker coats at a time (maybe I did them too thin) and have the time to wait for each one to dry completely.

I hope this was helpful, feel free to leave any comments or questions below and I shall get back to you.

Until next time!

Robin Sparkles
Monday, 2 July 2012

Studs are so back in! - Studded denim shorts project

Hey guys

Firstly, I just wanted to say a huge thank you! I have just logged on to find I have reached over 100 page views and would like to thank everyone who is visiting and reading my blog, this is what makes it all worth it.

Anywho, I am very much into quirky fashion with rock 'n' roll type influences, so you can image my happiness when recently I have been discovering studds are making a comeback!

I have seen studded shoes, studded bags, studded belts, studded t-shirts and most importantly studded denim shorts.

Me being me and always up for a new craft type challenge, I took to eBay and ordered myself 50 pyramid studs from China and waited patiently for them to arrive.  4 weeks on and they are here! Time to get studding.

pyramid shaped studs


As I said above I have seen all sorts of items donning the stud look but the one I liked the most was a pair of denim shorts I saw uploaded to Instagram.  This is what has served as the inspiration behind by stud denim shorts project.

I am off to stud my shorts now and will be back soon with a "how to" blog and photos of the outcome so stay tuned :0)

Robin Sparkles

LinkWithin

You might also like:
 

Blog Design by Bonjour Belle Designs