Tuesday, 27 August 2013

DIY: How to bleached jeans stage 1 - Carrie Bradshaw aka Sarah Jessica Parker Sex and the City inspired

carrie bradshaw sarah jessica parker satc sex and the city movie 2 bleached jeans uggs

Hey guys

Over the weekend I decided I wanted to do something a bit different.  I last used this technique when I was in secondary school around 15 years old so some time has passed but as I was looking through pictures of my most favourite programme EVER (SEX AND THE CITY) I noticed Carrie Bradshaw aka Sarah Jessica Parker wears some similar jeans to what I used to create and that they look great on her.

I am very much a wear things I like kinda gal, even if they arent "current" in the shops at the moment, I would rather look original than walk past 10 girls in the high street wearing the same outfit as me! Anywho, I digress...

I took an old pair of jeans (just incase something went wrong although the whole process is pretty fool proof) and laid them out in my parents garage on top of some unwanted polythene bags. 


carrie bradshaw sarah jessica parker satc sex and the city movie 2 bleached jeans uggs
 

I took a basic bottle of bleach (think mine is Tesco's own!) and just started spatting random dots of bleach about the place. Dont squeeze the bottle too hard, in fact bearly at all as you do not want massive splodges, just dots and lines if you get my drift.

carrie bradshaw sarah jessica parker satc sex and the city movie 2 bleached jeans uggs
 
Leave the bleach to soak in for a while then turn the jeans over and do the other side in the same way.

carrie bradshaw sarah jessica parker satc sex and the city movie 2 bleached jeans uggs
 
Once the bleach has finished setting in, I would say leave them around 1 hour, put your jeans in the washing machine and put them on a cycle with WATER ONLY.  No detergent or fabric softner.  As you will see from the pic below, they bubble up quite nicely on their own!

carrie bradshaw sarah jessica parker satc sex and the city movie 2 bleached jeans uggs
 
You will find when the waashing machine is finished that your bleached jeans still smell terribly of bleach, then put them on a wash using washing tablets/liquid and fabric softner now that the worst of the bleach is out.
 
You might find that they still have a slight "tang" to them but this will go over time the more times you wash them.
 
And here is the final product, stage 1 complete!

carrie bradshaw sarah jessica parker satc sex and the city movie 2 bleached jeans uggs

carrie bradshaw sarah jessica parker satc sex and the city movie 2 bleached jeans uggs
 
The next stage is to add studs and crystals and distress them like Carrie Bradshaw's, you can find the link to Stage 2 blog post by clicking here. (To be added once written).
 
Let me know what you think and whether you have ever tried bleaching your jeans before? Do you like the look on Sarah Jessica Parker aka Carrie Bradshaw? Do you like SATC for that matter?!
 
Until next time...
 
Robin Sparkles


Wednesday, 21 August 2013

GUEST POST REQUEST: NAIL STAMPING / ART DESIGN or DIY TUTORIAL POSTS

Me again!

Just a quick request, if anyone would like to be featured on my blog with a guest post please comment below and let me know.  You can email me your blog message and photos and I shall upload it and reference to your blog and let it be known that it is a "Guest Post".

guest post request nail stamping art design diy tutorial how to post

I hope to hear from some of you soon.

Robin Sparkles

Ps. If you have a post you would like to make that isnt regarding nail art designs or a DIY tutorial, just let me know and I am sure I can feature it! :0)
Tuesday, 20 August 2013

Jigsaw nail stamping & decal stamping design - Bundle Monster BM-319

nail stamping decal jigsaw stamp nails design art pink black bundle monster plates


Hello blogettes

Today I just wanted to post a manicure that I worked hard on last night, it includes normal stamping as well as my first decal stamping!

nail stamping decal jigsaw stamp nails design art pink black bundle monster plates


I used two designs off of the Bundle Monster plate BM-319.  My decal design isnt the neatest because I knocked it after I put my final top coat on (dammit!) so I apologise for that but they did look good at first, honest.

nail stamping decal jigsaw stamp nails design art pink black bundle monster

nail stamping decal jigsaw stamp nails design art pink black bundle monster plates

Let me know what you think and whether you have attempted decal stamping before.  I am going to leave you with a cute pic of my cat trying to get some fuss while I was taking my nail pics just because I think it is sweet!


nail stamping decal jigsaw stamp nails design art pink black bundle monster plates cat
 
Robin Sparkles

Friday, 16 August 2013

DIY: Vans 'Off the Wall' crystal rhinestone checkerboard pink and black Vans trainers

Hey guys

I recently discovered my checkerboard blinged up Vans I blogged about about 6 months ago in their box and decided to post some better pics as they have come out clearer on my new camera to the original post (click here).  I used the same size crystals and glue that I used in my DIY Converse crystal rhinestone blog (click here to view the original Converse crystallisation blog post).

I hope you likey, let me know what you think!

DIY Vans Off the Wall crystal rhinestone checkerboard pink and black Vans trainers shoes

DIY Vans Off the Wall crystal rhinestone checkerboard pink and black Vans trainers shoes

DIY Vans Off the Wall crystal rhinestone checkerboard pink and black Vans trainers shoes
 
Robin Sparkles
Wednesday, 14 August 2013

Vintage rose and waterfall nail art design – freehand


Hey guys

Just a quick one from me today. When I got home from work yesterday I was feeling heavily influenced by Sam at The Nailasaurus and decided to combine two of my favourites of her designs into one manicure for me.

vintage rose nail art design waterfall flowers pink green freehand
Here is what I used:

vintage rose nail art design waterfall flowers pink green freehand polish

Be sure to let me know what you think of this design, the waterfalls didn’t quite go to plan but I am fairly happy with the vintage roses.

Thanks for stopping by and reading.

Robin Sparkles
Tuesday, 13 August 2013

Pink crystal rhinestone nail design


crystal rhinestone nails barry m textured polish kingsland road design pink

Hey blogettes

At the weekend I attempted a crystal rhinestone nail design but couldn’t decide what layout I wanted to commit to so I tried 3 of my favourites!

I started off with applying OPI’s nail strengthener, then 3 coats of Barry M’s textured nail polish in colour Kingsland Road.  I then applied clear nail polish to the area of the nail I wished to place the crystals and with a dab of clear polish on the tip of a toothpick I picked up the crystals and placed them on the wet clear polish and left to dry.

On my thumb I opted to attempt a kind of gradient of crystals flowing up my nail.  On my middle finger I tried for a moon shape of crystals. On my little finger I just did a semi-circle lining my cuticle.

Let me know what you think and whether you have attempted any crystal rhinestone nail designs before.  Feel free to post a link below to your crystal rhinestone nail design blog post if you have one as I would love to read it.

Thanks for reading and I shall be back soon!

Robin Sparkles
 
crystal rhinestone nails barry m textured polish kingsland road design pink
 
Thursday, 8 August 2013

Makeup and brush storage – clear acrylic drawers and pencil pot holder (muji alternative)

makeup brush clear acrylic storage stand drawers muji

Hey blogettes

This post is to show off my new fabulous clear acrylic makeup and brush storage system I have purchased and am absolutely delighted with!  I got this to match my recent purchase the nail polish clear acrylic stand, a link to this blog post can be found by clicking here.
 
I got the Osco 3 drawers from the Ryman stationery store on eBay for £9.99, the link can be found by clicking here.
I got the pen pot stand for my brushes and taller makeup from my local Tesco store in the stationery section for £3.50.
The drawers are a lot smaller than the wide drawers people get from muji but they suit me just fine for now (who am I trying to kid?!).  If I were to get some more drawers in the event that my makeup collection expands I would probably go for the muji wide drawers (which are about £5 more than what I paid including postage so in hindsight should have got!!) and put them underneath the small set I have and pad out the gaps with some muji pots. The brush pot spins a full 360 degrees allowing easy access to any of the compartments and I am really happy with that. 
I am in total awe of Trying To Be Beautiful’s amazing muji acrylicmakeup and brush storage system and wish mine looked half as good as hers.  Still, I guess I shall have to build it up bit by bit!

makeup brush clear acrylic storage stand drawers muji


Let me know what you think and whether you have any clear acrylic makeup / nail polish storage.
Robin Sparkles
makeup brush clear acrylic storage stand drawers muji

makeup brush clear acrylic storage stand drawers muji

Nail polish stand : clear acrylic nail varnish holder / display stand (muji alternative)

nail polish varnish stand storage acrylic clear muji display
 

Hey guys

Today is just a quick review of a purchase I made last week.  It was for a clear acrylic nail polish stand inspired by the lovely Trying To Be Beautiful – her original post can be found here.
 
I bought the same stand as she links to in her blog post.  You can find the nail polish stand I purchased off of Amazon by clicking here.
I chose a nail polish stand that fitted approximately 30 nail varnishes but there are bigger ones available.  I love this cute little stand and it matches perfectly with my clear acrylic makeup storage (muji alternative) setup which you can see the blog post about by clicking here.
 
It came in a cute shaped box the same as the stand!
 

nail polish varnish stand storage acrylic clear muji display

nail polish varnish stand storage acrylic clear muji display


 Let me know what you think and whether you have any clear acrylic makeup / nail polish storage.
 
Robin Sparkles
nail polish varnish stand storage acrylic clear muji display
 
nail polish varnish stand storage acrylic clear muji display
 
nail polish varnish stand storage acrylic clear muji display


Tuesday, 6 August 2013

DIY: How to make a crochet pin cushion

DIY crochet how to make pin cushion granny square pillow

Hey guys 'n' gals

Today's blog post is a DIY tutorial on how to make a pin cushion.  This is an idea I saw at Stitch of Love and completely fell in love with and literally had to start making that second!

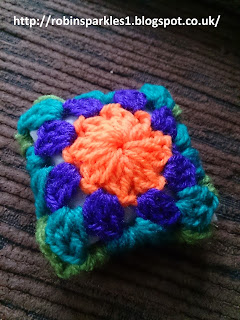
The actual pattern for the crochet granny square part of the pin cushion can be found at Attic 24 and is a gorgeous flowery granny square pattern.

Start by crochet a 5 inch squared granny square following the pattern found at Attic 24 then set this aside for later.

DIY crochet how to make pin cushion granny square pillow


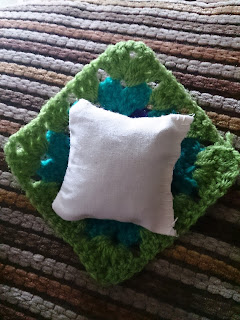
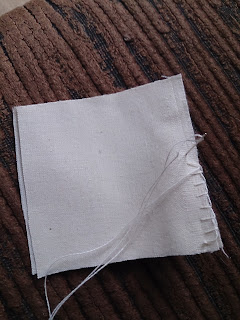
Then take any scrap of fabric material and sew a mini cushion measuring approximately 2.5 inches squared.  Dont forget to stuff it with polyfill or unwanted yarn / wool before sewing up the last side!


DIY crochet how to make pin cushion granny square pillow
 
Once you have stuffed the cushion / pillow and sewn up the last edge, lay it diagonally across the crochet granny square you made earlier.
 
DIY crochet how to make pin cushion granny square pillow

DIY crochet how to make pin cushion granny square pillow
 
Sew the sides up together to make it fit round the pin cushion and hey presto, you are done!
I just love that you can make this using any colour scheme you wish to make it reflect what you love.  Thank you so much to Stitch of Love for this inspiration in the first place.
 
Let me know what you think and if you give this a try be sure to let me know how it goes!
 
Robin Sparkles
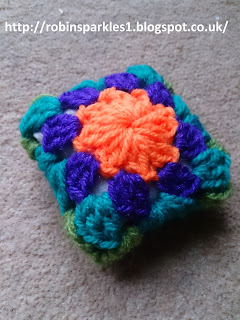
DIY crochet how to make pin cushion granny square pillow


DIY crochet how to make pin cushion granny square pillow

Monday, 5 August 2013

Nail polish manicure post: Mish-mash of texture


barry m textured nail polish kingsland road glitter ombre gradient varnish pink
 
Hey blogettes
 
Quick run through of what I used for this manicure.  Sorry it is a bit mish-mashy but I wanted to try out a few things!
 
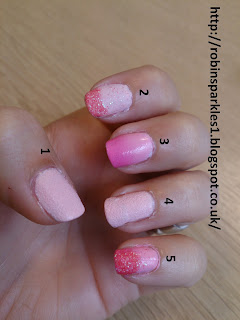
Fingers 1 & 4 are using the new Barry M textured polish in colour Kingsland Road.
 
Finger 2 is Kingsland Road, followed by some pinky red glitter applied on a clear polish, then the Rimmel matte top coat over the top of it all.
 
Finger 3 is an ombre gradient using a little makeup sponge.
 
Finger 5 was an ombre gradient the same as finger 3, but I applied clear polish to the top of the nail and some glitter then sealed this in with another shiny clear polish coat over the top.
 
Not sure why the picture is uploading on the side and can't figure out to change it so for this I apologise!
 
Until next time :0)
 
Robin Sparkles

Thursday, 1 August 2013

DIY: Homemade / handmade cat tree scratcher post

Hey guys

Me again!  Today I am posting photos of the stages we went through to build our very own cat tree! We have a bit of a "lively" kitty shall we say and as we are currently renovating and extending our entire house we don't want him to continue climbing and scratching our beautiful new home, we have even been holding off hanging some new curtains until this was done ~ please note that the curtains in the photos are not ones we were trying to protect, they are just temporary!

Kitty is a bengal cross and he certainly lives up to his breed of wanting to be as high as physically possible (and then some) to survey the land from up high.

We found a lot of cat trees online, mostly available in America so not any use to us, but felt that they were still no where near big enough to capture our boys attention.  Also, the couple of cat scratcher activity centre type things we have had have been really flimsy and just made from cardboard and he breaks them really easy.

We found he literally wants to be on the highest item / point in the room therefore it would have to almost touch the ceiling for it to be enough so that is what we did...yup, we put the first cat on the moon! (Okay, well 7ft is quite high).

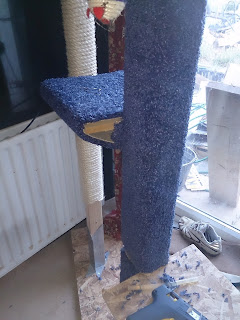
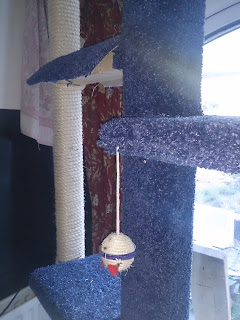
Please bear in mind this has been made mostly out of scrap pieces of wood and OSB we had lying around with our home so I am sure it could look a lot more attractive than ours does but it certainly does the job all the same. The only things we had to buy were the metal brackets that hold the posts to the base and the metal brackets that hold the platforms up, carpet offcut, sisal rope (you will need a lot. We used 40 metres of 10mm sisal rope going up not even 6ft.) oh and some screws.

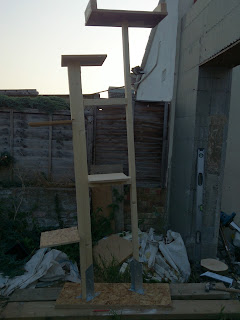
Stage 1:

DIY cat tree how to scratcher scratching post activity centre kitty

Cat enjoying stage 1:

DIY cat tree scratcher scratching post platform climbing

Cutting carpet to size:

DIY cat tree scratcher scratching post platform climbing carpet

Nail and glue gun the carpet to the posts and platforms:

DIY cat tree scratcher scratching post platform climbing carpet homemade handmade

DIY cat tree scratcher scratching post platform climbing carpet homemade handmade

DIY cat tree scratcher scratching post platform climbing carpet homemade handmade

Bottom half complete:

DIY how to make cat tree scratcher scratching post platform climbing carpet homemade handmade

Cat enjoying it more at this stage:

DIY how to make cat tree scratcher scratching post platform climbing carpet homemade handmade

And voila, the finished product:

DIY how to make cat tree scratcher scratching post platform climbing carpet homemade handmade

DIY how to make cat tree scratcher scratching post platform climbing carpet homemade handmade

I wanted to post this to show that you really can make our own things at a fraction of the cost shops charge for them and make them way more epic than anything that is available online. Our cat is loving this and he really does use it a lot.  The temporary curtains he used to climb and scratch are right next to it and *touches wood* he hasn't done so since this was completed.

Also, our boy is currently an indoor cat as there have been too many instances for my liking of kitty's being stolen in our area recently so we are hoping this will help him burn a lot of the pent up energy he obviously has to burn, so far so good.

I would love to read your comments below so please please please leave one to let me know what you think.

Robin Sparkles
LinkWithin

You might also like:
 

Blog Design by Bonjour Belle Designs