Showing posts with label DIY. Show all posts
Thursday, 31 July 2014

DIY: Fimo Polymer Clay Crochet Hook Decoration

fimo polymer clay crochet hook hooks decoration handle thumb grip

Hey guys

I have a fun craft evening the other night and of course Instagram was the reason why! I stumbled across some amazing picture on Instagram of people who decorate their crochet hooks using polymer clay.  Not only does it make them more comfortable to hold but they look bloomin' awesome too!

Like always once I get a bee in my bonet, I scoured the net for tutorials and found an awesome one on YouTube.  After work I went to a shop called The Range and purchased 3 packs of Fimo polymer clay and got to work.

Once I was happy with the designs you put them in the oven and bake them so that the polymer clay goes hard.  I really want to do the rest of my hooks in different colours now!

What do you think?? Let me know in the comments below!


L’Oreal Preference Glam Highlights Kit Review

l'oreal preference glam highlights kit hair dye home DIY

l'oreal preference glam highlights kit hair dye home DIY


Hey guys

Last week I decided my hair was starting to look a bit dull for my liking.  I usually get my highlights done by my hairdresser every 3-4 months and she has been on maternity leave since I last had them seen to in March.  Enough was enough, I must bite the bullet and figure something out.

I decided all the hairdressers around here were much too expensive.  I saw an advert on the tele for the L’Oreal Preference Glam Highlights Kit and thought to myself “it couldn’t be much easier” so purchased 2 boxes of the lightest shade 01 the next day. (I have A LOT of hair – normally it takes 3 boxes. Although I have to say I would have only needed 1 box in this instance which was very surprising.  I did still use both boxes and smother it but in hindsight 1 would have been fine).

The kit worked really well I must admit.  I sectioned off my hair doing the bottom sections first and slowly working my way up the layers, it really was easy.  It did take me a while to do but only because I have abnormally thick hair.

One brilliant thing is that the specially designed comb that comes with the kit can be kept and used time and time again, and you could use it with any hair dye, it doesn’t have to be the L’Oreal ones.  In a couple of months once this has settled, I plan to go lighter still and use a more platinum ash blonde for highlights and intend to use the nifty comb again to do it.

All in all I would definitely recommend this product to anyone who would like to use a home highlighting kit and doesn’t want to use the dreaded cap method!

Have you used this kit before? If so, what did you think? Let me know in the comments below.


Thursday, 3 April 2014

DIY: Make you own Filofax / Gillio insert tabbed dividers using paperstock or cardstock craft

Hey guys

I had a go at a little project last night and thought I would share the outcome with you!

I made myself some tabbed dividers for my Filofax Pocket sized planner.  I chose 6 different designs from a pack of card/paper I had got at Wilkinson's (bargain price of £3.00, 12 designs, 6 sheets of each) which were the perfect size for my pocket pages.

I already had some original Filofax tabbed number dividers 1-6 so I traced round each of those onto my card and cut around them using a super sharp scalpel for precision!  I then covered the front design of each tab with some clear sticky book cover type stuff (sorry not sure of the proper name) to toughen them up a bit as the card was a bit flimsy.  I then marked out where the holes should go and punched them through with a single hole puncher. Voila~

black and white filofax gillio insert tabbed dividers side label paperstock cardstock craft paper make your own DIT how to

black and white filofax gillio insert tabbed dividers side label paperstock cardstock craft paper make your own DIT how to


I don't own a label printer but my husbands work does so he is going to be printing me off some tiny labels for each tab, hopefully today if he remembers, you know men!  I shall update this post with a pic of the completed dividers once I have the labels on.  I am labelling my dividers as follows:-

  • Blog
  • YouTube
  • House
  • Meals
  • To Do
  • Goals
Let me know what you think! If you have a Pocket Filofax and would be interested in me making you some dividers then just give me a shout! :0)

What is your favourite item to have in your Filofax?

Tuesday, 1 April 2014

How to make a fur and fleece dog / cat double snuggle sack or sleeping bag or bed

dog cat snuggle sack sleeping bag youtube tutorial how to make fur fleece double comfy bed


Hey guys

I have uploaded a new YouTube video! This time it is showing you how to make your own doggy snuggle sack / sleeping bag.  The one I make is big enough for my cat and dog to share but you can adjust the measurements I provide to make your own one possibly smaller or bigger as you need.

You can watch my YouTube tutorial by clicking here.

NB: This tutorial is a sewing tutorial.  I had to hand sew as my machine is broken but if you have a machine it will be A LOT quicker!

If you would like me to write a blog post on how I made the dog snuggle sack then please let me know in the comments below :0)


dog cat snuggle sack sleeping bag youtube tutorial how to make fur fleece double comfy bed
No guys, you are meant to be IN it, not ON it!!


Thursday, 5 September 2013

DIY Tutorial: How to blonde ombre hair at home

Hi blogsters

Monday night I went a bit awol and decided I wanted a hair change.  I am trying to reign in a lot of luxuries at the moment as we have a lot to spend out on doing up our house so thought I would have a go at DIY ombre hair myself.  I thought, "whats the worst that can happen?! If it goes wrong ill just have the ends cut off!"

So armed with 2 boxes of Jerome Russell Bblonde medium life blonding kit I baracaded myself into our old bathroom and set to work!

WARNING! The smell of this stuff is....well...*singed nostrel hairs*

jerome russell Bblonde medium lift blonding kit ombre hair DIY home how to
 
If you are going to blonde ombre your hair make sure you use a product with peroxide / bleach otherwise it will just not work effectively.  My hair is a blonde colour anyway, so I left the product on as long as possible so that I would notice extreme light blonde on the ends.
 
You need to really freestyle it and scrunch it into your hair, you dont want it to look too precise or uniformed or it will not achieve the optimum ombre look.
 
Mix up your mixture, I used one box for the first round and another box for the second round.
 
jerome russell Bblonde medium lift blonding kit ombre hair DIY home how to
 
Round 1
 
Separate your hair in half and clip the top half up out the way for now. 

jerome russell Bblonde medium lift blonding kit ombre hair DIY home how to
 
Taking small sections at a time get a clump of hair dye in your hair and start scrunching it in the bottom of your hair.  For round 1, only put the hair dye half way up the desired length of the ombre you eventually want to achieve.  Not sure that makes sense...erm...say you want to dye 20cm of your hair length ombre, on round 1 only cover the bottom 10cm of hair with the hair dye.  If you are like me and have insanely thick hair, this will take pretty much the whole first box of hair dye.

jerome russell Bblonde medium lift blonding kit ombre hair DIY home how to
 
 
Let down the top half of your hair and make your way round that also.  If you have feathering at the front of your hair, I liked nipping the ends of the layers with some dye to add definition.
 
Wait for half an hour.............
 
Round 2
 
Mix up the second box of hair dye and work your way back round your small sections adding the dye higher up your hair. (E.g. for the full 20cm rather than the original 10cm). Leave this for a further 20 minutes or so.
 
Why do you do it like this?  Because......the original layer you put on first has longer developing time and will go lighter than the second round of dye.  This should make the ombre blend and look a lot less aggressive.
 
Tips
 
Obviously the length of time you leave the dye to develop on your hair is up to you, what worked for me will not work on someone elses hair depending on whether you have light or dark hair etc.
 
Don't try to make each little section of hair reach the same length when applying the dye.  Mix it up and make it more random...remember the point of ombre is NOT uniformed!
 
Voila

jerome russell Bblonde medium lift blonding kit ombre hair DIY home how to tutorial
 
Annoyingly this is still very subtle, in fact too subtle for my liking but I guess that is what happens when you try for an ombre look on already blonde hair! Still, I know it is there and that makes me happy!
 
I hope this tutorial was helpful, if you have any questions or comments feel free to comment below.
 
***I am not a hair dresser or hair person so I am only speaking from my own personal experience***
 
Have you tried to ombre your hair? How did it go?
 
Laters blogsters
 
Robin Sparkles


Tuesday, 27 August 2013

DIY: How to bleached jeans stage 1 - Carrie Bradshaw aka Sarah Jessica Parker Sex and the City inspired

carrie bradshaw sarah jessica parker satc sex and the city movie 2 bleached jeans uggs

Hey guys

Over the weekend I decided I wanted to do something a bit different.  I last used this technique when I was in secondary school around 15 years old so some time has passed but as I was looking through pictures of my most favourite programme EVER (SEX AND THE CITY) I noticed Carrie Bradshaw aka Sarah Jessica Parker wears some similar jeans to what I used to create and that they look great on her.

I am very much a wear things I like kinda gal, even if they arent "current" in the shops at the moment, I would rather look original than walk past 10 girls in the high street wearing the same outfit as me! Anywho, I digress...

I took an old pair of jeans (just incase something went wrong although the whole process is pretty fool proof) and laid them out in my parents garage on top of some unwanted polythene bags. 


carrie bradshaw sarah jessica parker satc sex and the city movie 2 bleached jeans uggs
 

I took a basic bottle of bleach (think mine is Tesco's own!) and just started spatting random dots of bleach about the place. Dont squeeze the bottle too hard, in fact bearly at all as you do not want massive splodges, just dots and lines if you get my drift.

carrie bradshaw sarah jessica parker satc sex and the city movie 2 bleached jeans uggs
 
Leave the bleach to soak in for a while then turn the jeans over and do the other side in the same way.

carrie bradshaw sarah jessica parker satc sex and the city movie 2 bleached jeans uggs
 
Once the bleach has finished setting in, I would say leave them around 1 hour, put your jeans in the washing machine and put them on a cycle with WATER ONLY.  No detergent or fabric softner.  As you will see from the pic below, they bubble up quite nicely on their own!

carrie bradshaw sarah jessica parker satc sex and the city movie 2 bleached jeans uggs
 
You will find when the waashing machine is finished that your bleached jeans still smell terribly of bleach, then put them on a wash using washing tablets/liquid and fabric softner now that the worst of the bleach is out.
 
You might find that they still have a slight "tang" to them but this will go over time the more times you wash them.
 
And here is the final product, stage 1 complete!

carrie bradshaw sarah jessica parker satc sex and the city movie 2 bleached jeans uggs

carrie bradshaw sarah jessica parker satc sex and the city movie 2 bleached jeans uggs
 
The next stage is to add studs and crystals and distress them like Carrie Bradshaw's, you can find the link to Stage 2 blog post by clicking here. (To be added once written).
 
Let me know what you think and whether you have ever tried bleaching your jeans before? Do you like the look on Sarah Jessica Parker aka Carrie Bradshaw? Do you like SATC for that matter?!
 
Until next time...
 
Robin Sparkles


Friday, 16 August 2013

DIY: Vans 'Off the Wall' crystal rhinestone checkerboard pink and black Vans trainers

Hey guys

I recently discovered my checkerboard blinged up Vans I blogged about about 6 months ago in their box and decided to post some better pics as they have come out clearer on my new camera to the original post (click here).  I used the same size crystals and glue that I used in my DIY Converse crystal rhinestone blog (click here to view the original Converse crystallisation blog post).

I hope you likey, let me know what you think!

DIY Vans Off the Wall crystal rhinestone checkerboard pink and black Vans trainers shoes

DIY Vans Off the Wall crystal rhinestone checkerboard pink and black Vans trainers shoes

DIY Vans Off the Wall crystal rhinestone checkerboard pink and black Vans trainers shoes
 
Robin Sparkles
Tuesday, 6 August 2013

DIY: How to make a crochet pin cushion

DIY crochet how to make pin cushion granny square pillow

Hey guys 'n' gals

Today's blog post is a DIY tutorial on how to make a pin cushion.  This is an idea I saw at Stitch of Love and completely fell in love with and literally had to start making that second!

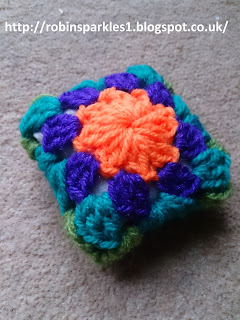
The actual pattern for the crochet granny square part of the pin cushion can be found at Attic 24 and is a gorgeous flowery granny square pattern.

Start by crochet a 5 inch squared granny square following the pattern found at Attic 24 then set this aside for later.

DIY crochet how to make pin cushion granny square pillow


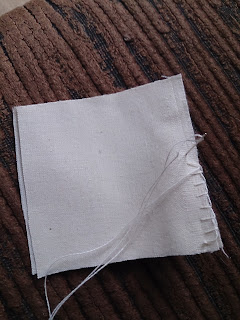
Then take any scrap of fabric material and sew a mini cushion measuring approximately 2.5 inches squared.  Dont forget to stuff it with polyfill or unwanted yarn / wool before sewing up the last side!


DIY crochet how to make pin cushion granny square pillow
 
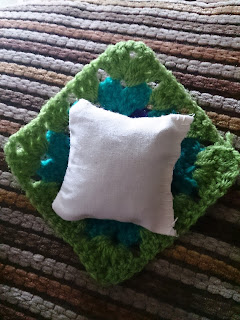
Once you have stuffed the cushion / pillow and sewn up the last edge, lay it diagonally across the crochet granny square you made earlier.
 
DIY crochet how to make pin cushion granny square pillow

DIY crochet how to make pin cushion granny square pillow
 
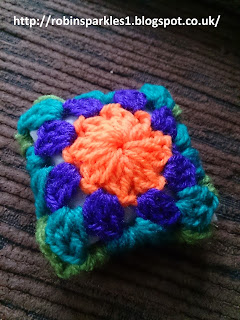
Sew the sides up together to make it fit round the pin cushion and hey presto, you are done!
I just love that you can make this using any colour scheme you wish to make it reflect what you love.  Thank you so much to Stitch of Love for this inspiration in the first place.
 
Let me know what you think and if you give this a try be sure to let me know how it goes!
 
Robin Sparkles

DIY crochet how to make pin cushion granny square pillow


DIY crochet how to make pin cushion granny square pillow

Thursday, 1 August 2013

DIY: Homemade / handmade cat tree scratcher post

Hey guys

Me again!  Today I am posting photos of the stages we went through to build our very own cat tree! We have a bit of a "lively" kitty shall we say and as we are currently renovating and extending our entire house we don't want him to continue climbing and scratching our beautiful new home, we have even been holding off hanging some new curtains until this was done ~ please note that the curtains in the photos are not ones we were trying to protect, they are just temporary!

Kitty is a bengal cross and he certainly lives up to his breed of wanting to be as high as physically possible (and then some) to survey the land from up high.

We found a lot of cat trees online, mostly available in America so not any use to us, but felt that they were still no where near big enough to capture our boys attention.  Also, the couple of cat scratcher activity centre type things we have had have been really flimsy and just made from cardboard and he breaks them really easy.

We found he literally wants to be on the highest item / point in the room therefore it would have to almost touch the ceiling for it to be enough so that is what we did...yup, we put the first cat on the moon! (Okay, well 7ft is quite high).

Please bear in mind this has been made mostly out of scrap pieces of wood and OSB we had lying around with our home so I am sure it could look a lot more attractive than ours does but it certainly does the job all the same. The only things we had to buy were the metal brackets that hold the posts to the base and the metal brackets that hold the platforms up, carpet offcut, sisal rope (you will need a lot. We used 40 metres of 10mm sisal rope going up not even 6ft.) oh and some screws.

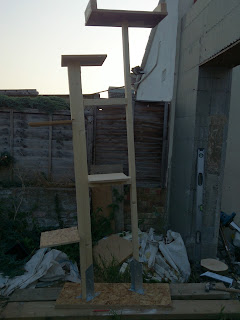
Stage 1:

DIY cat tree how to scratcher scratching post activity centre kitty

Cat enjoying stage 1:

DIY cat tree scratcher scratching post platform climbing

Cutting carpet to size:

DIY cat tree scratcher scratching post platform climbing carpet

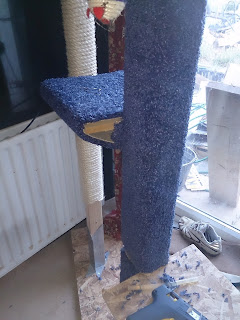
Nail and glue gun the carpet to the posts and platforms:

DIY cat tree scratcher scratching post platform climbing carpet homemade handmade

DIY cat tree scratcher scratching post platform climbing carpet homemade handmade

DIY cat tree scratcher scratching post platform climbing carpet homemade handmade

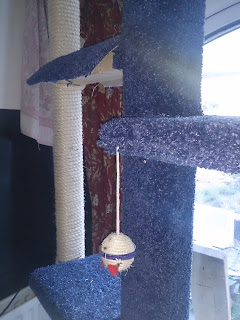
Bottom half complete:

DIY how to make cat tree scratcher scratching post platform climbing carpet homemade handmade

Cat enjoying it more at this stage:

DIY how to make cat tree scratcher scratching post platform climbing carpet homemade handmade

And voila, the finished product:

DIY how to make cat tree scratcher scratching post platform climbing carpet homemade handmade

DIY how to make cat tree scratcher scratching post platform climbing carpet homemade handmade

I wanted to post this to show that you really can make our own things at a fraction of the cost shops charge for them and make them way more epic than anything that is available online. Our cat is loving this and he really does use it a lot.  The temporary curtains he used to climb and scratch are right next to it and *touches wood* he hasn't done so since this was completed.

Also, our boy is currently an indoor cat as there have been too many instances for my liking of kitty's being stolen in our area recently so we are hoping this will help him burn a lot of the pent up energy he obviously has to burn, so far so good.

I would love to read your comments below so please please please leave one to let me know what you think.

Robin Sparkles
Monday, 29 July 2013

DIY: How to make a fleece dog or cat bed (no sew)

diy how to make no sew dog cat pet bed fleece

 Hiya

Here is a blog to (try to) explain how to make a no sew fleece cat / dog bed. You will need the following:
  • Fleece fabric (or a soft comfy fabric of your choice)
  • Polyfill stuffing
  • Scissors (sharp)
Cut two identical size pieces of fabric the size you wish your bed to be and place them on top of each other. When cutting the size of your fabric remember to allow  approximately 5cm extra around the edge to allow for the seam.

diy how to make no sew dog cat pet bed fleece

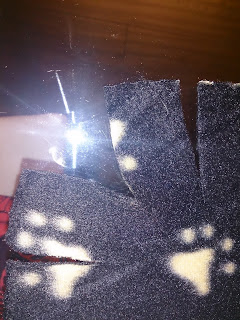
 Working your way around the edge of the bed cut 5cm long slits in the two layers of fabric.  Space these out approximately 3cm apart.

diy how to make no sew dog cat pet bed fleece

Cut the corners off entirely as they will only get in the way when making the knots.  You should now have something that looks like this!

diy how to make no sew dog cat pet bed fleece

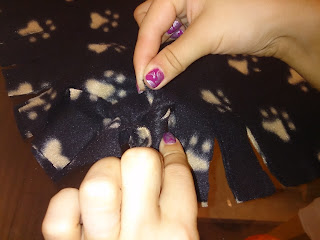
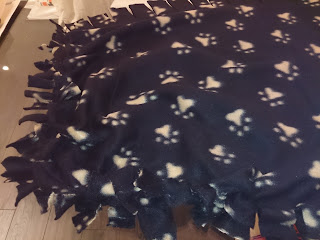
Next, you want to start tying knots with the tab of the top piece of fabric and the tab of the bottom piece of fabric.  Take one of the tabs of the top piece of fabric in one hand and the corresponding tab from the bottom piece of fabric in the other and tie a single knot with them together.  Work your way around the whole bed leaving a corner open ready for stuffing!

diy how to make no sew dog cat pet bed fleece

diy how to make no sew dog cat pet bed fleece


diy how to make no sew dog cat pet bed fleece

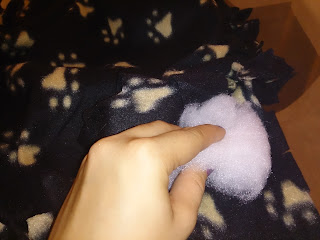
Now take your stuffing and put it inside via the corner you have not tied up yet. Pack it out (you will need a lot of stuffing) but be careful not to make it too rigid so that it is soft and comfy for your dog or cat.

diy how to make no sew dog cat pet bed fleece

The brilliant thing about the knot system is that if you want to wash the bed, you can just untie it, take the stuffing out and wash the fabric!

Anywho, that is how I made my no sew cat / dog bed.  I hope you enjoyed this tutorial and enjoy making your own one.  Any questions please feel free to comment below and I shall do my best to ask.  Be sure to let me know how your project goes too!

Robin Sparkles

Side view:

diy how to make no sew dog cat pet bed fleece

LinkWithin

You might also like:
 

Blog Design by Bonjour Belle Designs